Managevisor: New applications: Revised documentation
This documentation describes how to add applications to manage.attracs.com and manage-nightly.attracs.com. If you'd like to add organizations, use this documentation instead: Manage: Creating a new organization (https://app.clickup.com/2496230/docs/2c5q6-69975/2c5q6-10830)
Prerequisites
You should ask these from the developer who has tasked you with creating a new application: 1. Does the application already exist in a repository? Repo URL? 2. What should the application name be? 3. Is the application managed or not? 4. Does the application use Sendgrid? 5. What Google services does the application use? 1. Pub/sub? 2. Storage? 6. Does the application use a database? 1. MySQL or Postgres? 2. Dedicated instance or shared instance? 1. Dedicated database instances for applications are very rare. In normal circumstances we use the shared database instance and add a new database there for the application. 7. What is the health-check path for this application? 1. / 2. /api/ping 3. /api/health 4. Something else?
Create a Github repository
GitHub repositories are created under the Attracs organization.
Remember to enable branch protection for all new Github repositories!
@Henri Kivelä will check this part
1. Create a Github access token for yourself:
1. Click your profile in Github ➝, settings ➝ developer settings ➝ personal access tokens ➝ tokens (classic) ➝ Generate new token (classic) and create a token with the following permissions:
1. repo (full scope)
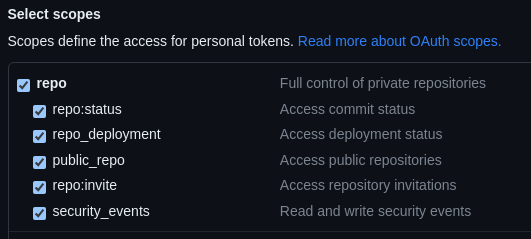 2. Copy the token, which is in the format of ghp_abc123... somewhere safe
3. Decrypt the token file used in the script so you can enter your own Github token there:
1. ansible-vault decrypt github.yml --vault-password-file=../../../.vault_password_file
1. The location of your .vault_password_file should be in the root of attracs-linux-playbooks
1. If you do not have it saved yet, you can get it for from 1Password, copy the Ansible Vault Encryption keys - linux password file.
2. Copy the token, which is in the format of ghp_abc123... somewhere safe
3. Decrypt the token file used in the script so you can enter your own Github token there:
1. ansible-vault decrypt github.yml --vault-password-file=../../../.vault_password_file
1. The location of your .vault_password_file should be in the root of attracs-linux-playbooks
1. If you do not have it saved yet, you can get it for from 1Password, copy the Ansible Vault Encryption keys - linux password file.
attracs-linux-playbooks:
./gcp/scripts/github/create_repo.sh (repo-name)
Tip: If you get:
403 GithubException: You need admin access to the organization before adding a repository to it.
error, you need to create your own personal github token:
1. 1. Click your profile in Github ➝, settings ➝ developer settings ➝ tokens (classic)
2. Create a token with the following permissions:
1. ☑️ repo
1. ☑️ repo:status
2. ☑️ repo_deployment
3. ☑️ public_repo
4. ☑️ repo:invite
5. ☑️ security_events
2. 1. Copy the token, which is in the format ghp12356....
2. Decrypt the token file located in..TODO with ansible-vault decrypt and replace the the old token after ansible_token: with your own token.
1. Password is in 1Password
3. 1. Encrypt the token again with ansible-vault encrypt , using the password that you previously used to decrypt,
Services_ports Google sheet
You'll need to give the application a unique port from which to run from. Choose the next port number in ascending order for stable and nightly. Do not choose a previously unused port. https://docs.google.com/spreadsheets/d/10trjuvrp_N8-OrqwsHchAysTIcrJRNqZ/edit?usp=sharing&ouid=105978654382102392446&rtpof=true&sd=true
Create DNS entries for the app
DNS is managed with Cloudflare
TODO: This needs to be updated, there is no automation yet for cloudflare. 1. Run the following to add DNS configurations:
Usage: ./gcp/scripts/dns/create_cname_record.sh <recordname> <recordvalue>
Where <recordname> is hostname and <recordvalue> lb name
Choose correct lb name from following list:
attracs-devops -project:
devops-lb 34.98.96.99

attracs-services-195009
gcplb   34.120.86.122 (TMS)
lb2 34.120.155.57 (CORE+OTHERS)

att-nightly
lb1n 34.117.203.247 (TMS)
lb2n 35.244.240.9   (CORE+OTHERS)

attracs-logistics:
road-cc-nightly-lb  34.144.248.151  (ROAD)
road-cc-stable-lb   34.49.67.73 (ROAD)

hetzner:
frontend 95.216.1.224 (ROAD OLD)
-
- Example:
plain
    ./gcp/scripts/dns/create_cname_record.sh my-app lb3
would create https://my-app.attracs.com in Road's GCP load balancer.
-
-
- Do not add any domain suffixes eg. attracs.com to the
create_cname_record.shscript command or the DNS will fail! 1. If you did accidentally do this, you can use themeshmooncredentials to log in to DNS Made Easy and change the records.
- Do not add any domain suffixes eg. attracs.com to the
-
-
-
- For road nightly, all DNS records go to lb2n until lb3 is fixed for nightly applications. Ticket: You do not have access to this Task
-
-
- You can verify that your DNS record works by running:
plain dig my-app.attracs.com- Inform Ahola IT about the new DNS
- TODO: Where? How? Who?
Create GCP infrastructure with Terraform
This part is optional if you don't need any GCP services, like Pub/Sub or storage buckets for the application.
- Create the project's folder manually in GCP under attracs.net ➝ projects/
- Create a new branch under the adi-infra repository, for example pr-my-app
- In your own branch, create a new directory under adi-infra/terraform/gcp/projects/ and copy the Terraform templates from adi-infra/terraform/gcp/templates/ into this newly created directory.
- Remove the template files that you don't use
- These are the minimum required template files:
- api.tf
- iam.tf
- main.tf
- variable.tf
- These are the minimum required template files:
- Make the necessary Terraform configuration changes and validate them with terraform plan
- Make a pull request and get it approved
- Run terraform apply
Create the database
When making database changes to nightly, and especially the stable environment, it is advised that you run the commands first in a database that is inconsequential. You can for example make a clone of the nightly Cloud SQL instance and test the commands there first before making potentially irreversible changes to an in-use database.
it is also advised that you use transactions (MySQL, Postgres) when making changes to a database. Transactions are a sort of safe bubble outside of the database's reality where changes are only simulated, not applied. Transactions can be initiated in both types of databases with the BEGIN; statement. You can then revert unwanted changes by simply running ROLLBACK;. This will take you out of the transaction, so re-run the begin statement. When you are ready to apply the changes, you can run COMMIT; to apply them.
⚠️ If possible, avoid making clones of production environments as they contain varying degrees of sensitive information!
Shared instance database
First set up the cloud-sql-proxy as instructed in this documentation Connecting to a database (https://app.clickup.com/2496230/docs/2c5q6-69975/2c5q6-213921).
MySQL
TODO
Postgres
Stable
Stable database is configured like nightly, with some differences: * Port is 55432
Nightly
- Initiate a proxy connection to the nightly SQL database instance by using the port 55435.
- Log in as postgres (Credentials are in 1Password)
psql -h 127.0.0.1 -p 55435 -u postgres -d postgres
- Look at the database permissions table with
\du. You need to have:- Create database,
- Create role attributes
- and cloudsqlsuperuser role

- If you do not have those permissions, follow this page for instructions on how to do so: Postgres: grant yourself superuser privileges (https://app.clickup.com/2496230/docs/2c5q6-69975/2c5q6-310515)
- Now you should be able to run the ansible playbooks without having to deal with permission errors:
./gcp/scripts/database/create_db_and_user.sh ./config/postgre/<environment-variable-file.yml> <application_database_name>
Dedicated instance database
TODO, do we use these?
Create Vault secrets
Vault login is currently broken, you can follow the ticket here Investigate broken vault GCP login (https://app.clickup.com/t/861mmev9p). The only way to log in and use the vault for now is to use the root token.
Add vault secret entries
- Click on the
kv-v2-nightlysecret engine - Add a new secret by clicking on the "
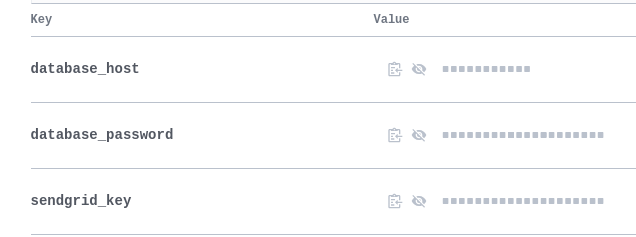
Create secret +" button - If it has a database:
database_host- Value is the public IP address of the nightly database you used previously
database_password- Value is the password you copied earlier when creating the database.
- If it uses Sendgrid, ask the developer if it needs this:
sendgrid_key- Value is provided by the developer (Share securely with 1Password)
- This is what the user interface looks like:
- Save changes. If you messed up one of the keys, you can click on the "
Create new version +" to edit them.
Add attracs-application-configs repository changes
attracs-application-configs/application-configs/road-services-feedbacks/attracs-nightly.yml.ctmpl
Push changes with the script provided by the attracs-linux-playbooks repository:
1. From the root of the playbooks repository run the following script:
ansible-playbook vault_agent/vault_agent_config.yml --vault-password-file=.vault_password_file
Create supervisor run configs
Supervisor run configurations are the configurations that tell Managevisor which applications to run under what backend. These configurations are stored in attracs-linux-playbooks/supervisord/run/ and the configurations files are called application-name-deployment-environment.conf.j2
Example Nightly configuration:
[program:tms-feedback-nightly.attracs.com]
command=/bin/bash /etc/attracs-supervisor/run-process.sh -p tms-feedback-nightly.tar.gz -w server -x server -a -production -nightly -port 5056 -log-level debug -debug-database -reverse-proxy-host https://tms-feedback-nightly.attracs.com -config /etc/tms-feedback/attracs-nightly.yml
directory=/home/syncthing/attracs-builds/tms-feedback/nightly
stopwaitsecs=60
startsecs=5
autorestart=true
How to implement a new supervisor run config:
- Using the previous example Nightly configuration:
- Change the program name:
[program:example-app-nightly.attracs.com] - Change the tar package location:
-p example-app-nightly.tar.gz - Change the location of your application where your
main.goresides (check the repository for more clues), for example:-w server-w services/example_app/server
- Change the port to the one you defined for your application in the Google Sheets
services_ports.xlsx - Change the reverse proxy host to point to your application's DNS:
-reverse-proxy-host https://example-app-nightly.attracs.com - Change the config file to your application's path:
-config /etc/example-app/attracs-nightly.yml - Change the directory to your application:
directory=/home/syncthing/attracs-builds/example-app/nightly
- Change the program name:
- Example configuration:
[program:example-app-nightly.attracs.com]
command=/bin/bash /etc/attracs-supervisor/run-process.sh -p example-app-nightly.tar.gz -w server -x server -a -production -nightly -port CHANGE1234ME -log-level debug -debug-database -reverse-proxy-host https://example-app-nightly.attracs.com -config /etc/example-app/attracs-nightly.yml
directory=/home/syncthing/attracs-builds/example-app/nightly
stopwaitsecs=60
startsecs=5
autorestart=true
Add your Supervisor run configs to backend(s)
In attracs-linux-playbooks/supervisord/config/hosts you have a JSON file for each host, or as we know it, a backend. The JSON files look like this:
{
  "includes": [
    "/etc/attracs-supervisor/syncthing.conf",
    "/etc/attracs-supervisor/attracs-managevisor-agent.conf",
    "/etc/attracs-supervisor/attracs-managevisor.conf",
    "/etc/attracs-supervisor/attracs-ci.conf",
    "/etc/attracs-supervisor/memcached.conf"
  ]
}
When you've determined the correct backend(s) to put your application in, just add a new row to the list and remember to add the , comma to the previous row!
* push these changes to the servers!!
* ansible playbook to run is something like this:
ansible-playbook supervisord/supervisord-update-all-configs.yml -l road-confidential-instance-nightly-1,road-confidential-instance-nightly-2 --vault-password-file=.vault_password_file
Managevisor
- after successfull ansible playbook run configs
- reload managevisor server configs → server actions
-
Reload Supervisor config
Load Balancer
Add Monitoring
Create Web Scenario in Zabbix * add step * name * path * Status codes * add graph Add it to the Grafana * Response Code dashboard * Source Zabbix * Override item name to look pretty
todo
Add documentation about GCP load balancer backend additions 1. Add the named port to instance group 2. Create a health check for the backend service 3. Create a backend service 4. Create host and path rules